
THIS DOWNLOAD PAGE THOROUGHLY EXPLAINS EVERYTHING YOU NEED TO KNOW BEFORE INSTALLING GOMDOLIGHT CUSTOM FIRMWARE. FAILURE TO READ THIS DOCUMENT BEFORE INSTALLING WILL ALWAYS LEAD TO VARIOUS UNEXPECTED PROBLEMS. PLEASE READ.
I WILL NOT ANSWER ANY QUESTIONS ALREADY ADDRESSED IN THIS DOCUMENT.
THIS DOCUMENT AIMS TO ADDRESS THE FOLLOWING QUESTIONS:
- What is GomdoLight custom firmware?
- What will change after installing?
- Will GomdoLight fulfill my requirements?
- What do I need to install GomdoLight?
- How do I install GomdoLight?
- How do I remove GomdoLight and revert to stock?
- How to utilize GomdoLight better?
- What should I do when problems arise?
|
– TABLE OF CONTENTS – 5. Troubleshooting / Solutions 10. Support
|
1. GOMDOLIGHT OVERVIEW
Greetings,
Introducing GomdoLight KitKat, the most advanced, user-friendly, fully-customizable firmware environment for KOREAN LG devices.
GomdoLight modifies official stock firmware to remove all the unnecessary components preloaded by operator/manufacturer, and reorganizes key system parts to achieve the most ‘basic’ Android OS with manufacturer’s flavor. This will somewhat improve battery life, system stability, and responsibility. But most of all, you will find your device more comfortable to use.
WARNING! GOMDOLIGHT INSTALLATION PROCESS ALWAYS INVOLVES MODIFICATION OF SYSTEM PARTITIONS. ONCE THE SYSTEM PARTITION IS MODIFIED, (STRICTLY SPEAKING) IT WILL VOID YOUR WARRANTY.
Installing GomdoLight will NOT delete your user data, or perform an unwanted factory reset. However in the event of failure there is a small possibility of data loss. Nothing is 100% perfect, after all.
As stated above, you do NOT have to factory reset your device to use GomdoLight. However performing a factory reset after first installing GomdoLight will clear all ‘dirty’ data from your device, and may improve performance.
2. WHAT WILL CHANGE
Here you can find what components are added, modified, or removed when you install GomdoLight.
2.1. Components added
The following lists illustrate all the apps and other components added to system, when installing GomdoLight.
2.1.1. Update Center components
- Keep: A notetaking application to quickly create, access and organize notes, lists and photos
- MobiCalc Free: A very powerful calculator app
- MoreLocale 2: An app to choose system locales not natively supported by device
- OK Scan: A QR code scanner with very high response rate
- SoundAbout: An app to redirect audio output
- TeslaLED: A flashlight widget with no privacy concerns
- Titanium Backup: A backup solution, needless to say
- X-plore: A very powerful file manager tool that support root
2.1.2. Multimedia components
- Additional ringtones, alarm sounds, notification sounds.
2.1.3. Miscellaneous
- Google Internet Sync (ChromeBookmarksSyncAdapter): Syncs stock web browser bookmarks with Google Chrome
2.2. Components removed
After you install GomdoLight KitKat, the following components (if available) will be removed from the system partition, and lose their status as ‘preloaded components’. However, if you need them again, you can still reinstall those via Play Store. NOTE: If those components are updated before installing GomdoLight, each updated component will have its updated copy on the data partition, and it will be treated as a user-installed app. You will have to remove such components manually.
2.2.1. Google apps
Maps, Street View, Hangouts, Drive, Chrome, Play Games, YouTube (relocated to the UPDATE CENTER), Gmail (relocated to the UPDATE CENTER)
2.2.2. LGE or third-party apps
Box, DefenseTechnica, LGE customer support-related apps, Q Shopping, V3 Mobile, VidClip, Video Editor, VuTalk, User Manual, Polaris Office Viewer, OTA Update, Q Translator (relocated to UPDATE CENTER), DioDict (relocated to UPDATE CENTER), LG SmartWorld (relocated to UPDATE CENTER)
2.2.3. SKT preloaded apps
11st Street, B tv mobile, baSKeT, Go! NFC, hoppin , LockClient, PayPin, SKT Remote Support, Smarter Subway, SmartTouch, SyncManager, T cloud, T LTE Pack, T map, T Stock, T store Book, T Simple Home, T Membership, T Bell Ring, T Services, T Contacts, T Phone, Gureum, Nate, NateOn, MelOn, Moneta Service, Mobile T world, Mobile T money, Shopping and Wallet, SmartDMB, Smart Wallet, Smart Bill, Shinhan Mobile Payment, Cyworld MiniHompy, App Guide, Upax Stock, ColorLight HD, PhotoPunch, T store (relocated to UPDATE CENTER)
2.2.3. KT preloaded apps
Genie, LG Home LTE theme, MOCA, ZooMoney, olleh CS, Smart Protector, Smart Bill, olleh ebook, olleh navi, olleh touch NFC, olleh TV now, olleh Wi-Fi Toggle Widget, olleh MyWallet, olleh apps, olleh comics, olleh music, olleh club, olleh market (relocated to the UPDATE CENTER)
2.2.3. LG U+ preloaded apps
Afreeca TV for LGU+, C-Games, OZ Navi, 002 Overseas Calling, U+ App Town, Contents Manager, DingDong, Freestyle2 Anywhere, Game Store, U+ Customer Center, Mirror Call, Mnet, LG U+ T money, Music BellRing, SmartTag, Smart Wallet, U+Box, U+HDTV, LGT WIPI Player, U+ Store (relocated to the UPDATE CENTER)
2.3. Components replaced or modified
The following components will be replaced or modified to better support/protect user’s interest.
2.3.1. Non-customizable modifications
- Sounds played when using NFC: changed to simple short beeps, less embarrassing in certain public places that require silence.
- Camera APK is replaced so that you can turn off shutter sound
2.3.2. Customizable modifications
- Emoji (color graphic emoticons) priority
- Backlight brightness control for front touch buttons (not applicable for navbar-controlled device models)
- Boot/shutdown animations (can be deleted)
- Adblock (hosts file)
- Status bar (no operator string, no unnecessary icons in multitask screen, improved battery percentage indicator)
- Navigation bar (home touch button) resize (only for navbar-controlled device models)
2.4. Components disabled at your disposal
GomdoLight provides several options to disable some system applications while not actually removing them. Since they are not removed, but just deactivated, they can be revived at any time you want.
2.4.1. Google apps
- Google Play Books
- Google Play Movies
- Google Search / Google Now
- Google+
2.4.2. Operator apps
- Operator Wi-Fi Connectivity Manager (KT)
2.4.3. Manufacturer (LG) apps
- Camera
- Gallery
- Music
- Video
- TV(DMB)
- SmartShare
- Internet(web browser)
- Downloads
- Weather
- Alarm/Clock
- Calendar
- Memo
- Tasks
- Calculator
- Notebook
- Q Voice
2.5. GomdoLight Features
GomdoLight provides some unique features that maximizes comfort, usability, and availability even when undesirable situation arises.
2.5.1. Convenience
- Self-root without any external help
- Automatic SuperSU Installation
- Adblock toggle
- EasyMod (modify system without root)
- Xposed framework installation without root
- Extended functions accessible via GomdoLight flag files
2.5.2. Disaster recovery
- GomdoLight System Image Backup
- Automated installation/uninstallation of BusyBox without root
- GomdoLight Auto Backup (for some critical user data files)
- Subscriber information/IMEI partition backup/restore
- Android installation ID backup/restore
2.5.3. Performance
- GL Powersaver (dynamic CPU clock control, GPU clock limitation)
- Boot time fstrim support
2.5.4. Problem-solving at installation stage
- GomdoLight configuration reset
- Clearing damaged/incompatible user data
3. RECOMMENDED USERS
GomdoLight takes out many features from the stock firmware. Therefore it is generally not advisable for Android first-timers.
Recommended for the following users who:
- …want their device to be clutter-free
- …want to expand the devices’ capabilities
- …seeks certain level of balance between stability, comfort, and performance
- …have a strong will to try to solve the problem when one arises
- …try to post questions as detailed as they can
But NOT recommended for the following users, who:
- …don’t know what features their device have
- …are new to Android OS, and know almost nothing about it
- …prefer to have many features loaded as possible
- …refuses to read documents, even if they are necessary to install and use the ROM
- …do not understand the installation process always involves some degree of risk
- …ask first when a problem arises, without searching
- …ask other person to install the ROM for them, without studying and trying
- …do not like me (Celes/Gomdolius), the ROM developer
4. HOW TO INSTALL
This section explains how to perform a fresh installation of GomdoLight over properly-working, compatible stock firmware. If you’re installing GomdoLight for the first time, or reinstalling GomdoLight after you updated/reflashed the base stock firmware, this is the place you’re looking for.
▶ To upgrade an existing installation of GomdoLight, click here
▶ To completely uninstall GomdoLight from your device, click here
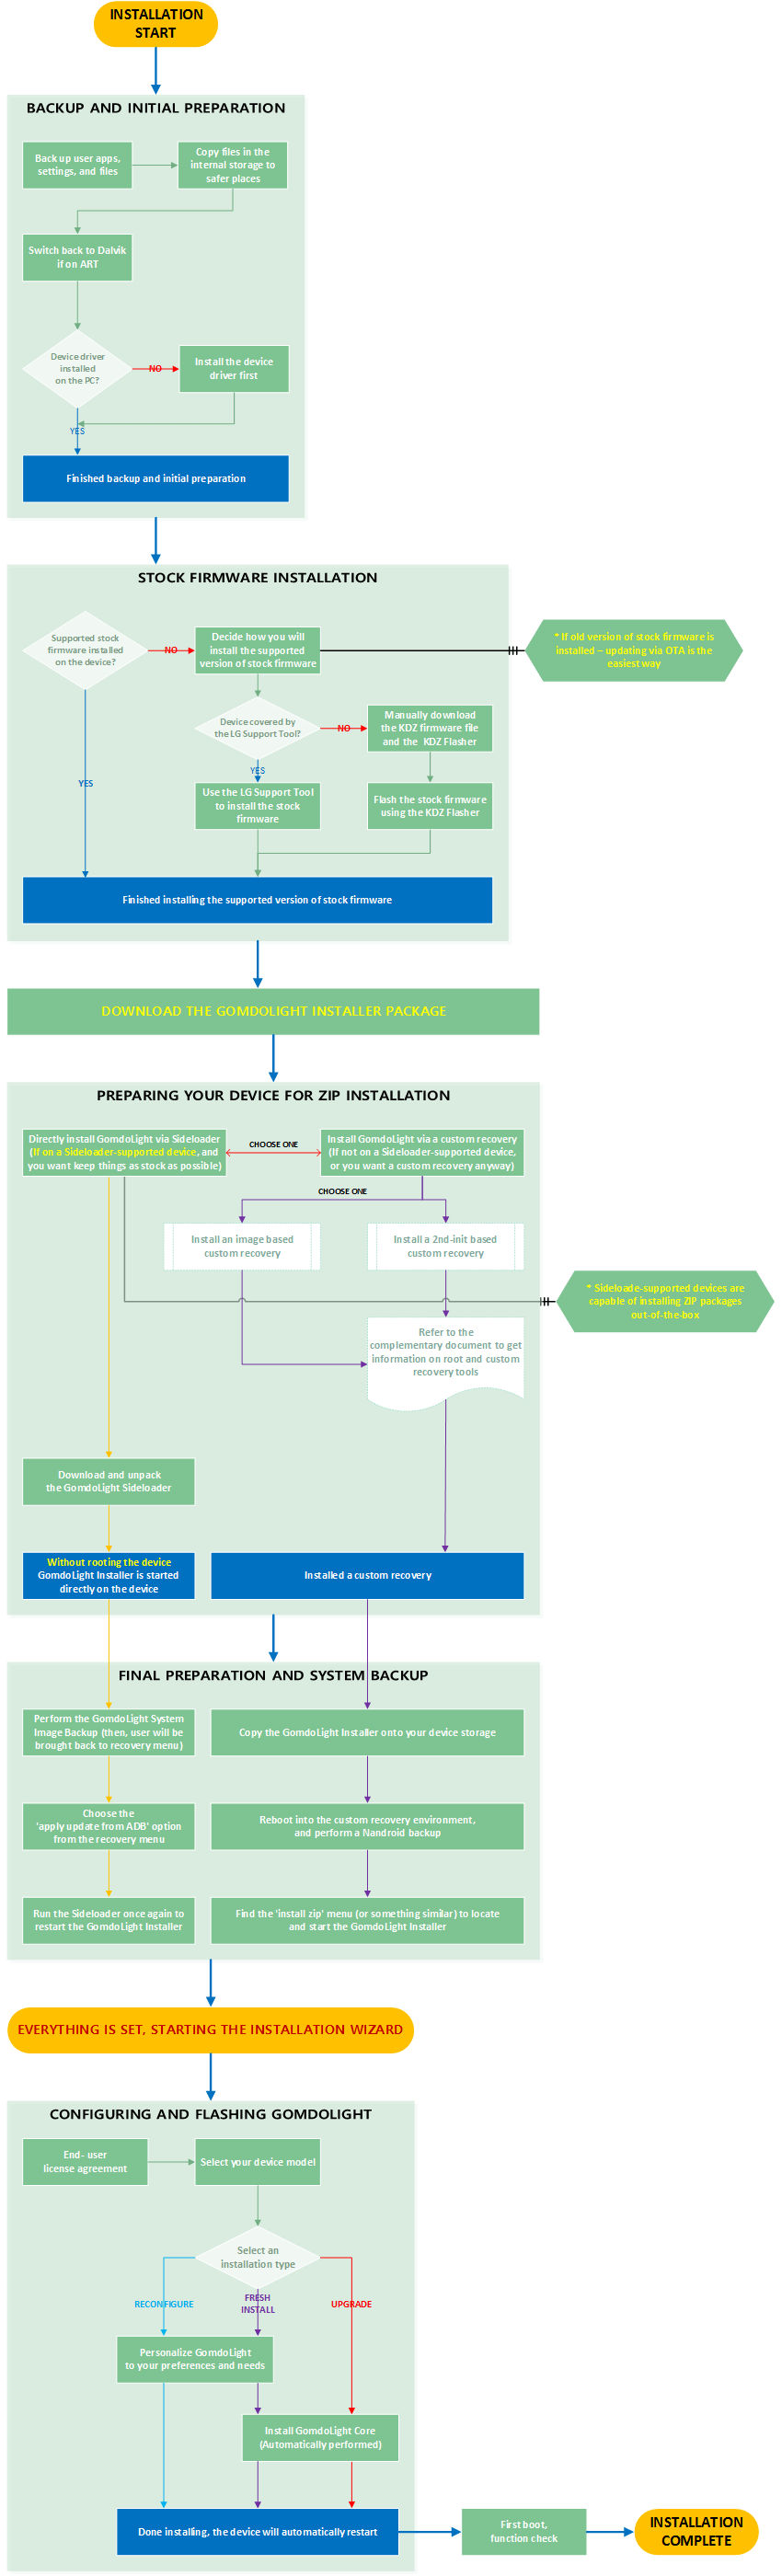
4.1. Installation process overview
Installation process can largely be divided by the following categories: 1) BACKUP AND INITIAL PREPARATION, 2) STOCK FIRMWARE INSTALLATION, 3) DOWNLOADING GOMDOLIGHT INSTALLER PACKAGE, 4) PREPARING YOUR DEVICE FOR ZIP INSTALLATION, 5) FINAL PREPARATION AND SYSTEM BACKUP, 6) CONFIGURING AND FLASHING GOMDOLIGHT. Here, number 2 can be skipped if your stock firmware version is already compatible with GomdoLight, and number 4 can be skipped for some device models.
From now on, this manual will cover EVERYTHING you need to meet all conditions required to successfully install GomdoLight, and provide a step-by-step explanation for each stage. This document is indeed lengthy, however on the other hand, is designed from the ground so that it could be understood very quickly, even for those who never installed a custom firmware before. Your confidence (NOT overconfidence) is the most important thing when installing GomdoLight – please do not falter, just ease yourself and follow the instructions.
In this guide, some green text like this will contain very important information required for successful installation, so read them very carefully.
4.2. Supported device models
You have to have a device compatible with GomdoLight, of course, to install GomdoLight.
- LG Optimus G: LG-F180S, LG-F180K, LG-F180L (Hereafter, “G”)
- LG G2: LG-F320S, LG-F320K, LG-F320L (Hereafter, “G2”)
- LG G3: LG-F400S, LG-F400K, LG-F400L (Hereafter, “G3”)
- LG G3A: LG-F410S (Hereafter, “G3A”)
- LG G3 Cat.6: LG-F460S, LG-F460K, LG-F460L (Hereafter, “G3”)
- LG G Flex: LG-F340S, LG-F340K, LG-F340L (Hereafter, “Gflex”)
- LG GK: LG-F220K (Hereafter, “GK”)
- LG G Pro: LG-F240S, LG-F240K, LG-F240L (Hereafter, “Gpro”)
- LG G Pro 2: LG-F350S, LG-F350K, LG-F350L (Hereafter, “Gpro2”)
- LG Gx: LG-F310L, LG-F310LR (Hereafter, “Gx”)
- LG Gx2: LG-F430L (Hereafter, “Gx2”)
- LG Optimus LTE3: LG-F260S (Hereafter, “LTE3”)
- LG Optimus Vu2: LG-F200S, LG-F200K, LG-F200L (Hereafter, “Vu2”)
- LG Vu 3: LG-F300S, LG-F300K, LG-F300L (Hereafter, “Vu3”)
- LG G Pad 7.0 LTE: LG-V410 (Hereafter, “Gpad7LTE”)
GomdoLight MIGHT work on other devices but it is not guaranteed, and installing GomdoLight on devices not listed as compatible, is neither recommended nor supported.
4.3. Installation flowchart
The flowchart below describes the whole installation process. Since it is designed to provide solutions to almost every possible situation, you might feel very confused at first sight. However it is not complicated at all; carefully follow the steps, and you will be able to install GomdoLight without any problem (I hope). Several key parts in the flowchart are linked to the corresponding sections in this document. First try to outline an installation plan according to the flowchart, and make use of image map hyperlinks to check the details. (Links may not work if you’re on a mobile device)
4-1. BACKUP AND INITIAL PREPARATION
Before you begin, you want to make sure that the whole installation process will not get interrupted by a simple and silly oversight, and that nothing will happen to your precious data when something goes wrong.
4-1.1. Backup and Android runtime settings
Even the most polished and well-tested custom firmware, like GomdoLight, has a slight possibility of failure due to various unexpected reasons. Therefore, you have to back up your important data – ‘apps and settings’, and ‘your personal files in the internal storage’. And, if you have switched the runtime to ART in developer settings, you should switch it back to Dalvik.
4-1.1.1. Backing up user’s apps and settings
What does it mean by ‘apps and settings’? They are the apps you installed, and their configuration and settings. You should back up your apps and settings by using at least one of the methods introduced below. Backup data should be stored in the safe places.
- LG Backup (recommended)
A very powerful, robust, easy-to-use backup solution preloaded by LGE. If you are not sure of which backup solution to use, choose LG Backup. - Third-party backup apps
If you’re aware of some trustworthy third-party backup solutions, you may use them. - Nandroid backup
Recommended if it’s available, and you know about it. If you’re not sure, stick to LG Backup. Nandroid backup is one of the most powerful, and complete backup method provided by any type of custom recovery. If you have a custom recovery environment installed on your device already, perform a Nandroid backup now. However, double-check if the custom recovery you installed properly supports Nandroid backup and restore. - ADB backup
Recommended only for advanced users. If you are aware of ADB backup, you probably know how to use it, and need no more explanation.
WARNING: GomdoLight has a feature that automatically backs up important user information. However it is not designed for use as a primary backup solution, and rather it is more focused on preserving raw data files for critical user information. Do NOT solely rely on GomdoLight Auto Backup. Use at least one of the dedicated backup solutions mentioned above.
4-1.1.2. Backing up user’s files saved in the internal storage
Copy the important files (entire storage contents, preferably) saved in the internal storage, to safe places such as external SD card, PC, or cloud-based storage. If you backed up your apps and settings to the internal storage, the backup data is NOT protected from data loss. Be sure to include the backup data when you copy the internal storage contents to safe places. If you’re backing up your files to your PC, it is recommended that you follow these steps:
(1) First, install SD Scanner app from the Google Play Store.
(2) Press ‘Start Rescan’ button. All files in the internal storage will be scanned and added to the media database.
(3) Connect your device to your PC via a USB cable. For connection mode select ‘Media File Transfer’ (MTP).
(4) Use the file explorer to copy the files from your device’s internal storage.
Internal storage is not protected (in other words, all files saved in the internal storage will be erased) when you perform a factory reset. It is extremely difficult to recover filed deleted from the internal storage. You MUST back up your files before trying to install GomdoLight, and it is strongly recommended that you back up your files regularly.
* When copying files from the internal storage, exclude the following folders:
- storage
- system
- Android
- data
- ANYTHING that begins with . (dot)
Now you have backed up your apps, settings, and files, let’s move on to the next step.
◀ Click here to go back to the flowchart
4-1.2. Switching back to Dalvik runtime
This paragraph does not apply if you have not changed the runtime to ART in ‘Developer Options’, or if your device does not support ART. If you do not know what ART runtime is, you probably have not changed it at all, so skip this paragraph.
GomdoLight is NOT compatible with ART. This is because GomdoLight installs deodexed system APKs in order to maximize compatibility with multiple base firmware versions. By design, GomdoLight detects which runtime is selected during boot, and switches back to Dalvik when it detects that ART is enabled. However, to minimize the chance of boot failure, manually revert to Dalvik before installing GomdoLight.
You do not need to be concerned about using ‘slower’ Dalvik instead of ‘faster’ ART. GomdoLight is light and responsive enough, even with Dalvik.
◀ Click here to go back to the flowchart
4-1.3. Device drivers
To install GomdoLight or stock firmware that is compatible with GomdoLight, your PC has to have all the necessary drivers and runtime components installed.
However, to properly install all drivers, you need to unlock the ‘Developer Options’ and enable the ‘USB debugging’ option there.
(1) First detach your device from PC.
(2) On your device, go to ‘Settings’, find ‘About phone’ (or, ‘About tablet’ for tablet devices, but hereafter uniformly referred as ‘About phone’) under ‘General’ tab.
(3) Find ‘Software information’ under ‘About phone’.
(4) Now, tab the ‘Build number’ item, for 7 times, until you see a message congratulating you for unlocking Developer Options.
(5) Press [BACK] to exit ‘About phone’. You will see ‘Developer Options’ is added under ‘General’ tab.
(6) Go into the ‘Developer Options’ and select (enable) the ‘USB debugging’ option.
(7) Now exit back to the home screen, and connect the device to PC.
Drivers set can be downloaded from the LGE website, at the following URI.
http://www.lg.com/us/lgeai/Drivers/pages/mobile-drivers.html
To check if the drivers are installed successfully, do the following.
(1) On your PC, open the ‘Control Panel’, find ‘System’, and locate the ‘Device Manager’.
(2) If you haven’t connected your device to PC yet, do so now. ‘USB debugging’ option should be enabled on the device side.
(3) Set connection type to ‘Media File Transfer’ (MTP), or ‘LG Software’. If your PC attempts to search for drivers from the Windows Update, skip it.
(4) When everything settles down, you should see ‘Android Sooner Single ADB Interface’, or a similar entry in the ‘Device Manager’.
(This effort needs done only once per PC, unless you reinstall the Windows operating system)
This concludes the ‘backup and initial preparation’ step.
Now, you should check if the stock firmware version currently installed on your device is compatible with GomdoLight, and install the right version if it’s not.
◀ Click here to go back to the flowchart
◀ Click here to go back to the GomdoLight Sideloader troubleshooting procedure
4-2. STOCK FIRMWARE INSTALLATION
As explained above, GomdoLight is installed by heavily modifying the pre-existing system. In other words, GomdoLight is a large-scale patch. Because of this, GomdoLight requires a compatible version of stock firmware already installed on the device prior to its installation. Therefore, if you have an incompatible version of stock firmware, or, a completely different type of custom firmware, such as CyanogenMod, MIUI, or AOSP, installed on your device, you MUST install a compatible version of stock firmware before you try installing GomdoLight.
And, aside from this, the stock firmware installation process explained from now on is very important for when you uninstall GomdoLight or update the base stock firmware. You are strongly advised to carefully read the explanation below and get yourself somewhat accustomed to it.
4-2.1. Which stock firmware version is compatible (=supported) by GomdoLight?
Now you would want to know which version of stock firmware is supported by GomdoLight, and check if yours match or not. For your convenience the ‘firmware compatibility table’ below illustrates the range of version compatibility for each supported device. If you’re not sure about the version of the firmware currently installed on your device, you can check Settings → (‘General’ tab) → About phone → Software information to find out.
CLICK HERE TO OPEN THE FIRMWARE COMPATIBILITY TABLE in a separate window/tab.
Do you have a compatible, and recommended version of stock firmware, already installed on your device? Then you do not need to continue with this step. You can skip to ▶ Downloading GomdoLight Installer Package step. However, this section may still be worth reading, to get yourself familiarized with the standard disaster recovery procedure.
4-2.2. If the current firmware is not compatible with GomdoLight, or is compatible but not at the recommended level
It is the best when you already have the recommended (and compatible) version of stock firmware, but there are times you can’t always have the best. For example your firmware version might be too low, or too high. (Sometimes, GomdoLight may not support the latest firmware, and it often takes some time to analyze the new firmware and track down the changes) Or, your device may running a custom firmware environment.
Here you can learn what you can do when your device is not in the ‘best’ condition. You can,
(1) First, use the OTA feature to update the stock firmware without a PC. This is the easiest way, and is recommended when:
- your firmware version is too low, or,
- your device does not support the ‘LG Support Tool’, and the firmware compatibility table (above) does not provide a download for the recommended version, so the recommended version can be reached only by receiving OTA updates.
(2) Or, you may have to overwrite (reinstall) the whole firmware, if:
- your firmware version is too high,
- you can’t receive OTA updates for whatever reason,
- your device has a custom firmware other than GomdoLight, or,
- your device is running GomdoLight, but you are aware that there is a newer stock firmware version that is compatible with GomdoLight, and you want to reinstall GomdoLight on top of that newer firmware version.
I will not explain how to receive OTA updates since it is too easy. Go to Settings → (‘General’ tab) → About phone → Update Center → Software Update, and follow the on-screen instructions.
However, overwriting the whole firmware needs more than a few clicks – that is, you need some more efforts. Basically you’re given three options to do this:
- LG Support Tool (only if your device supports it),
- KDZ firmware package file and KDZ Flasher utility from this manual, or,
- TOT firmware package file and LG FlashTool elsewhere.
This manual covers the first two only, because they are more user-friendly. If you prefer TOT then it’s your choice, but it’s up to you to get a TOT file, and properly configure and use the LG FlashTool. For the most cases, the LG Support Tool or the KDZ Flasher should be enough for you, and this manual offers everything you need. * For Gx2, TOT firmware package is provided as an exception.
◀ Click here to go back to the flowchart
4-2.2.1. Using the LG Support Tool to automatically reinstall the stock firmware
If your device supports the LG Support Tool, you’re in luck. If possible always use this tool when you need to reinstall the stock firmware. LG Support Tool is the official user-level customer service utility, so it is user-friendly, and if something goes wrong during the firmware installation you will be still covered by warranty.
The following device models supports the LG Support Tool:
- LTE3
- G
- Vu2
If your device is not on the list, then your device does not support the LG Support Tool (=you’re out of luck), so you should ▶ Manually download and install a KDZ firmware file. Especially, LG Support Tool forcefully update the following device models to Android 5.0 Lollipop OS, which GomdoLight KitKat does not support. (Once Android 5.0 Lollipop is installed, it can be switched back to Android 4.4 KitKat, but a factory reset becomes mandatory to boot properly). Never use the LG Support Tool with these devices if you intent to install GomdoLight.
- G2
- Gpro
- Gpro2
- G3
- G3cat6
If your device is on the list, then you can use the LG Support Tool. Let’s download it from the following URI.
When the download finishes, run the file (B2CAppSetup.exe) and wait until you see the LG Support Tool main window. Connect the device to your PC via a USB cable, and find the ‘Options’ menu near the upper-right corner of the window. Then, select the ‘Upgrade Recovery’ item from the Options menu.
Set the USB connection type to ‘LG Software’ from the device, if available. You do NOT have to be in ‘DOWNLOAD MODE’ to use this tool. Also your device’s battery should be charged over 50% to initiate the flash process. If not, charge the battery first.
LG Support Tool is easy enough to use, and you should be able to successfully flash the stock firmware without trouble if you stick to the on-screen instructions. Therefore this manual does not cover the details on the LG Support Tool.
If you’re done installing the stock firmware with the LG Support Tool, you have now finished the ‘stock firmware installation’ process. Congratulations, you’re just few steps away from installing GomdoLight. Ignore the manual downloading/flashing process explained below, and skip to the ▶ DOWNLOADING GOMDOLIGHT INSTALLER PACKAGE part straight away.
◀ Click here to go back to the flowchart
4-2.2.2. Manually downloading and flashing the stock firmware (KDZ Flasher)
If your device does not support the LG Support Tool, or for some reason you cannot use it, you should manually download the firmware (KDZ) file and flash it using the KDZ Flasher. Of course, you should 1) first DOWNLOAD the KDZ firmware file for your device, and the KDZ Flasher, 2) then actually flash the KDZ firmware onto your device. * NOTE: a KDZ file contains the complete image for all critical partitions, therefore flashing it will eventually install the stock firmware
(1) First, downloading the necessary files.
- The ‘firmware compatibility table’ lets you download the KDZ firmware file(s) for your device. Find your device model, and click on the firmware version showing in blue (link).
Click here to open the firmware compatibility table.- While download the KDZ firmware file, go to ▶ GomdoLight Tools to download the KDZ Flasher, and return here by clicking ‘▶ manually flashing the stock firmware’.
- Unpack the downloaded KDZ Flasher, and remove any software programs related to LG Mobile, except the device driver package, and (if necessary) the LG Support Tool. For details, refer to the tutorial document provided at http://gomdolight.com/?page_id=1634.
- If you finished downloading the KDZ firmware file for your device, and unpacked the KDZ Flasher, you now have everything you need to flash the stock firmware. Remember where you downloaded the KDZ firmware file, and where you unpacked the KDZ Flasher.
(2) Now everything is set, so let’s start flashing the stock firmware
- If you’re on Windows Vista, 7, or 8, and have used the KDZ Flasher before, open a new instance of Windows Explorer, type %programdata% in the address bar, and delete LGMOBILEAX folder if exists.
- First completely turn off your device, then disconnect (unplug) from PC if connected.
- Boot into the ‘DOWNLOAD MODE’:
– G, Gpro, GK, Gx: Press and hold Volume UP+DOWN at the same time, and connect your device to PC.
– G2, G3, G3A, G3cat6, Gflex: Press and hold Volume UP, and connect your device to PC.- Then open the aforementioned tutorial document to proceed, but please be advised of the following.
– Backup: Flashing a KDZ firmware file always involves certain degree of risk, and there is a small chance that your device won’t boot after you flash. Usually this is caused by updated system apps (version mismatch), therefore a factory reset might be required after the flash. This means you have to back up your apps, data, and files before flashing just if you have not done so yet. Refer to ▶ Backup and Android runtime settings for details.
– CSE KDZ: Provided in the firmware compatibility table are some ‘CSE’ KDZ firmware files. Those CSE KDZ firmware files should be flashed in ‘CSE web upgrade’ mode, otherwise it will fail to flash. Set ‘Select Type’ to ‘CDMA’, and ‘PhoneMode’ to CS_EMERGENCY’ to activate the CSE web upgrade mode. * WARNING! CSE web upgrade mode will ALWAYS force a factory reset even if you do not want to, which means you have to back up everything whenever you intend to flash those CSE KDZ firmware files. NO EXCEPTIONS!
– If your device fails to boot properly after flashing KDZ: The easiest way to factory reset your device is to re-flash the KDZ file with CSE web upgrade option, regardless whether if it’s CSE type or not.
– Installing ‘runtimes’: This is usually not necessary, but if the KDZ Flasher does not function properly, installing MSXML 4.0 and .NET Framework 3.5 may help.
(3) Your device will automatically restart when it is done flashing the KDZ firmware file.
Now, your device should have the supported (and recommended) version of stock firmware installed completely.
The next step is downloading the GomdoLight Installer package.
◀ Click here to go back to the flowchart
4-3. DOWNLOADING GOMDOLIGHT INSTALLER PACKAGE
There are numerous ways to install GomdoLight, but whatever you choose, you will definitely need the GomdoLight Installer. (of course, how could you install GomdoLight if you do not have its installer package?). Downloading GomdoLight Installer package is as easy as just clicking this link: ▶ GomdoLight Downloads / History. However please make absolutely sure that you’re not downloading the installer package for a wrong device. (You will feel bad if you have to reinstall the stock firmware just because you’ve had installed a wrong file not intended for your device)
When download starts, you can return here easily, by clicking ‘◀ Return to the installation guide, ‘Downloading the GomdoLight Installer package’.
You now have the GomdoLight Installer package in your hands. Congratulations.
From now on, we will check if your device can install GomdoLight straight away, and if it’s not possible, adequately prepare your device for GomdoLight installation.
◀ Click here to go back to the flowchart
4-4. PREPARING YOUR DEVICE FOR ZIP INSTALLATION
This process can be somewhat complex, and requires your informed decision. Please read carefully and thoroughly.
Before you proceed you are advised to understand the following:
- First. GomdoLight is not an app, but a custom firmware. It is a specially engineered ZIP file (called ‘recovery ZIP’), and your device has to be capable of parsing it to install GomdoLight.
- Second. Some device models have such capability out-of-the-box, even with stock firmware installed. These devices will be called ‘Sideloader-supported’ devices hereafter.
- Third. However if not, you should install a ‘custom recovery’ to grant your device ZIP installation capability.
- Fourth. There are two types of custom recovery environments, ‘image based’, and ‘2nd-init based’. Image based recoveries are more reliable when your device fails to boot (since they are independent of system partition), however some of them may have (sometimes critical) adverse effects.
- Fifth. Even when your device has ZIP installation capability out-of-the-box (lucky case), you might want to install a custom recovery for more advanced features. This is perfectly okay, since GomdoLight is compatible with most custom recoveries.
Then, let us find out 1) what devices have ZIP installation capability out-of-the-box(Sideloader-supported), 2) how to install GomdoLight without custom recovery on Sideloader-supported devices, and 3) how to install custom recovery and GomdoLight, if you want more advanced features or if your device is not one of such Sideloader-supported devices.
4-4.1. Installing GomdoLight WITHOUT a custom recovery on Sideloader-supported devices
So far, the following devices are known to support the GomdoLight Sideloader, being capable of installing recovery ZIP files out-of-the-box:
- G
- G2
- GK
- Gpro
- Gx
If your device is one of those ‘Sideloader-supported’ devices, you can immediately, and directly install GomdoLight onto the pure stock firmware WITHOUT ROOTING YOUR DEVICE OR INSTALLING A CUSTOM RECOVERY, using a specialized tool named ‘GomdoLight Sideloader’ (automated, intended for most average users), or using ADB sideload command (manual, intended for advanced users and developers). In other words, Sideloader-supported devices requires NONE of the preparatory procedures excluding backup. However if your device is unfortunately NOT a Sideloader-supported device, that means you will have to root your device and install a custom recovery first.
Therefore, if you do not want a custom recovery AND if your device is a Sideloader-supported device, then continue reading the instructions below. However if not — if your device is not a Sideloader-supported device AND/OR you want to install a custom recovery — skip to ▶ ‘Installing GomdoLight FROM a custom recovery’.
With the GomdoLight Sideloader, you can easily load the GomdoLight Installer package onto your device. Internally this script-based tool automates ‘adb sideload’ command. To use this tool, you need to 1) Download the GomdoLight Sideloader first, and 2) adequately PREPARE before running it.
(1) First, jump to ▶ ‘GomdoLight Tools’ section to download the GomdoLight Sideloader, and return here by clicking ‘▶ Directly installing GomdoLight onto the Sideloader-supported devices’.
- GomdoLight Sideloader should be run from your PC, not your mobile device. You should download it to PC.
- Extract the GomdoLightSideloader.rar file you downloaded (be sure to extract everything in the archive), and you will see a folder named ‘_SIDELOAD’.
- Find the GomdoLight Installer package (ZIP file) you downloaded earlier, and put (in other word, move) it into the ‘_SIDELOAD’ folder. DO NOT EXTRACT ANYTHING OUT OF THE GOMDOLIGHT INSTALLER PACKAGE, move the ZIP file itself.
(2) Connect your device to PC via USB cable.
- Set the connection type to ‘LG Software’ if it’s available, and if not, set it to ‘Media File Transfer’ (MTP).
- If your PC attempts to find/load/install device drivers, wait until it finishes.
(3) Finally, run the _GomdoLightSideloader.cmd script file.
- Follow the on-screen instructions provided by the GomdoLight Sideloader.
- If the GomdoLight Sideloader stops (no progress) for a long time, especially while standing by for device detection, close and run it again.
- GomdoLight Sideloader automatically checks for possible errors in the GomdoLight Installer package, so you can skip integrity check.
When the GomdoLight Sideloader finishes transmitting the GomdoLight Installer onto your device, the device will recognize the file, and start (execute) the GomdoLight Installer program. (NOTE: Some devices, like LG G2, will have recovery log messages overlapped on the GomdoLight Installer program. This is normal, and does not affect the installation.)
It is possible that you just start installing GomdoLight. However, you are strongly advised to go through the ‘GomdoLight System Image Backup’ procedure. This will create a set of backup images for critical system partitions (but not your apps, data, and files), for a last-minute failsafe measure. Do not proceed with the installation process yet, and skip to the ▶ ‘FINAL PREPARATION AND SYSTEM BACKUP’ step.
Are you perhaps having trouble with the GomdoLight Sideloader?
(1) You see a message like ‘Sideloader will try to connect to your device via ADB. If your device shows a dialog asking if you’re going to allow USB debugging, please make sure you will ‘Always allow from this computer’ before pressing OK.’ and you see no progress anymore.
- Check if ▶ Drivers are installed properly.
- Check if ‘USB debugging’ option is enabled. How to do this is well explained at the link above to the drivers section.
- If your device is showing a dialog asking if you’re going to allow USB debugging, check the box labeled “Always allow from this computer”, and press OK.
- If it does not show any progress though you have the drivers properly installed on your PC, and have USB debugging option enabled, then disconnect the device from PC first, wait for a few seconds, and connect the device again.
- If problem still persists close the GomdoLight Sideloader and run it again.
(2) You are instructed what to do while in the recovery mode, and see a message like ‘Waiting for device to become ready.’ then you see no progress anymore.
- Are you sure you’re on a Sideloader-supported device? There are not many devices that support the GomdoLight Sideloader. ▶ Refer to the list of supported devices at the top of this section. If your device is not on the list, you should ▶ Install a custom recovery instead, and install GomdoLight via the custom recovery.
- USB connection problem maybe? Check if the device is tightly connected, and do not (physically) move the device while installing. USB connection problem sounds petty, but is indeed frequent.
(3) On your PC you see GomdoLight Installer is transferred to the device completely (100%), and you see a message like ‘Completed transferring the file to sideload’. However, your device does not start installation, and displays error messages ‘E:failed to certify whole-file signature’, ‘E:signature verification failed’ instead.
- Are you sure you’re on a Sideloader-supported device? (For the list of support devices ▶ refer to the top of this section) If so, the GomdoLight Installer package you downloaded is damaged, therefore you have to download it again. Installing GomdoLight with damaged or corrupt Installer package may critically damage your device, and the interruption was made as a fail-safe measure.
- If your device does not support GomdoLight Sideloader, you should ▶ Install a custom recovery, and install GomdoLight via the custom recovery.
(4) You rebooted into the recovery mode, and the only thing you see is a broken Android suffering in pain, without any menu-like interface available.
- Your device clearly does not support the GomdoLight Sideloader. You should ▶ Install a custom recovery, and install GomdoLight via the custom recovery.
(5) You already have a custom recovery installed, and you do not understand how to use GomdoLight Sideloader.
- It is completely pointless to use the GomdoLight Sideloader with a custom recovery installed. Skip to the ▶ Final preparation using a custom recovery.
If none of the above applies to your case, simply closing and running the GomdoLight Sideloader again may help.
◀ Click here to go back to the flowchart
4-4.2. Installing GomdoLight FROM a custom recovery
As stated above, there are two types of custom recovery environments, ‘image based’, and ‘2nd-init based’. Image based recoveries are installed on the dedicated recovery partition, thus more reliable when your device does not function properly although some of them may have adverse effects. On the other hand, 2nd-init based recoveries are installed on the common system partition, so when the system partition is corrupted they are less reliable but they have practically no negative effects. However both are same in that they all can be used to install GomdoLight, therefore, in principle, you may install either image based one or 2nd-init based one according to your choice. But in reality, there are very few custom recoveries available for LGE devices due to their closed nature. This greatly limits your choice of custom recoveries, and in most cases you will probably have to take the only one available for your device. If there are several custom recoveries for your device, generally it is not recommended that you install an image based custom recovery AND a 2nd-init based custom recovery at the same time.
(1) Image based custom recovery
- An image based custom recovery is a complete image of customized recovery partition, designed to entirely REPLACE the stock recovery. An image based custom recovery will work even when system partitions are damaged, providing ‘true’ disaster recovery capabilities. However since it is very tightly integrated with system (firmware), it may impose some unwanted limitations
- You should keep in mind, that if you install an image based custom recovery,
– if you are on LG G2, you will have to manually recover knock-on and knock-code features by upgrading touch firmware if you install AutoRec custom recovery. And even if you do so, though knock-on will function properly, knock-code will not work before you turn on the screen.
– When you factory reset your device from Settings menu, the device may fail to boot properly after that and boot into recovery mode whatever you do, until you revert to stock firmware.- Installing an image based custom recovery can be very dangerous. Use every care when installing one, especially if it requires manual input of shell commands (such as ‘dd’). Even the slightest mistake can be disastrous.
(2) 2nd-init based custom recovery
- A 2nd-init based custom recovery does not replace the stock recovery at all, since it is installed on the system partition alongside the OS, not the recovery partition. In other words, it co-exists with the stock recovery, and invoked only by certain command or button input. Therefore, when system partition is damaged, a 2nd-init based custom recovery may not work. However since it is loosely integrated with system (firmware), it usually does not cause unexpected problems.
To install a custom recovery you can find custom recoveries for your device by yourself, or, refer to this complementary document to get necessary information in one place. The document is mainly in Korean language, but all necessary parts are also in English. Generally, to install a custom recovery your device needs to be rooted. However you do not have to fear rooting your device; GomdoLight has a very powerful built-in function to completely unroot, while leaving GomdoLight unaffected, resolving any security/compatibility problems.
If you have got all the required tools from the document linked above, follow the steps illustrated below to root your device and install a custom recovery. These steps are DESIGNED SPECIALLY FOR GOMDOLIGHT, and DIFFER SIGNIFICANTLY FROM WHAT YOU WOULD ORDINARILY EXPECT. READ CAREFULLY.
(1) To root your device
- First download the root tool you want from the complementary document. Newer root tools generally have a higher chance to succeed.
- For basic usage of these root tools refer to the respective developers’ instructions.
- All root tools will recommend that you install SuperSU root management app. However, IGNORE THE RECOMMENDATION, and DO NOT INSTALL SUPERSU APP NOW. Let GomdoLight automatically handle the problem.
(2) To install a custom recovery
- Download the recovery installer tool you want (AND compatible with your device!) from the complementary document.
- Most custom recoveries will be easily installed just by loading an app and pressing an on-screen button (marked as ‘STANDALONE’).
- Because you do not have the SuperSU app installed, custom recovery installer apps or scripts will not ask for your permission to grant root privileges; they will instantly run as root. This lack of confirmation is indeed a security threat, but still, DO NOT INSTALL SUPERSU APP. When you finish installing GomdoLight, GomdoLight will automatically install the SuperSU app for you.
- Even if you successfully installed a custom recovery, do not reboot into it now. You still have more things to do yet.
Now, you probably have a custom recovery installed on your device, and your device should be capable of installing recovery ZIP packages.
You’re now ready to load a recovery ZIP package onto your device, regardless whether if the device is capable of ZIP installation out-of-the box or not.
While it is technically possible to start installing GomdoLight right away, for your safety we will first back up core system components.
◀ Click here to go back to the flowchart
4-5. FINAL PREPARATION AND SYSTEM BACKUP
In this step we will back up core system components, and finally flash GomdoLight onto your device. You’re almost there.
This step varies greatly according to whether if you’re using the GomdoLight Sideloader or a custom recovery environment to install GomdoLight. To summarize,
1) if you’re using GomdoLight Sideloader, we will first perform a ‘GomdoLight System Image Backup’, and when it finishes and exits automatically, sideload the GomdoLight Installer once again to finally start flashing GomdoLight,
2) or if you’re using a custom recovery, we will first copy the GomdoLight Installer onto your device, check its integrity, reboot into custom recovery, perform a Nandroid backup, and finally run the GomdoLight Installer.
Each is explained in details below.
4-5.1. Using the GomdoLight Sideloader
From the previous step you have run the _GomdoLightSideloader.cmd and followed the on-screen instructions. Now your device should show the GomdoLight Installer wizard.
(1) First, let’s do the GomdoLight System Image Backup.
- GomdoLight System Image Backup is a powerful built-in system backup solution provided by the GomdoLight Installer.
- When you choose the device model, the main menu appears. Select ‘System Image Backup/Restore’.
- Proceed with the system image backup procedure. Usually it will take 3~5 minutes, but if you choose to compress the backup data, it will take about 30 minutes or more (up to 1 hour). You probably do not want to compress the backup data unless you’re really running short on internal storage.
- The progress bar will stay still at 10% during the backup process. This is normal.
- When it is finished the GomdoLight Installer will automatically exit, and you will be taken back to stock recovery menu.
(2) Choose the ‘apply update from ADB’ option again.
- Use the volume buttons to move the cursor, and use the power button to select, just like you have done earlier when you ran the GomdoLight Sideloader for the first time. Device will stand by for sideload.
(3) Run the GomdoLight Sideloader again.
- Now the device is in the recovery mode. When the GomdoLight Sideloader asks you such question, answer accordingly.
- GomdoLight Sideloader will recognize the device right away, and start sending the GomdoLight Installer once more. GomdoLight Installer will run shortly
Now, you are all set.
No more preparation. You’re FINALLY installing GomdoLight! Skip directly to the ▶ ‘CONFIGURING AND FLASHING GOMDOLIGHT’ step.
◀ Click here to go back to the flowchart
4-5.2. Using a custom recovery
Any custom recovery is FAR MORE POWERFUL compared to the stock recovery (that’s why it is ‘custom’, obviously) and MUCH MORE user-friendly. However, as with great power comes great responsibility, you should be very careful of what explained below when you have a custom recovery installed on your device.
- GomdoLight is basically a large-scale patch, and thus requires a functioning stock firmware installed on the system. DO NOT WIPE(=FORMAT) /system partition. Your device will NEVER boot. If you have done so accidently, use Nandroid or KDZ to restore /system.
- When you’re manually exiting from the custom recovery environment (reboot now), it might notify that the ROM may overwrite the custom recovery with stock one and ask you if you would like to ‘disable recovery flash’. You MUST choose ‘No’. Selecting Yes to this question will severely incapacitate GomdoLight (all dynamic components will cease to work). In this case you should reboot into custom recovery again and reinstall GomdoLight with ‘Upgrade/Repair’ option. If you’re on a 2nd-init based custom recovery, you may lose both root and custom recovery, leaving you no viable way to run the GomdoLight Installer to recover from this failure. (Worst-case scenario is that you might have to revert to stock firmware, perform a factory reset, root the device again, and finally reinstall the 2nd-init based custom recovery — the last thing you would like to do!)
- Similarly, when exiting from the custom recovery, it might insist that the device is not rooted and ask you if you would like to root. You MUST choose ‘No’. rooting by a custom recovery is unstable, and is likely to conflict severely with GomdoLight. GomdoLight can root your device in a safer way.
- If you have an image based custom recovery installed, you should NOT factory reset your device from Settings (or, while the device is properly booted into Android OS). Your device may fail to boot into Android properly, and keep rebooting into custom recovery INFINITELY. If you would like to factory reset your device, do it ONLY WHEN the device is booted into the custom recovery. If you accidently performed a factory reset from Settings menu and cannot get out of the custom recovery environment, revert to stock firmware (KDZ, GomdoLight System Image Restore, Nandroid, etc.) if you can. If it’s not possible, run the GomdoLight Installer, and from the main menu, select ‘Troubleshooting’, ‘Delete damaged data’, and ‘Infinite recovery boot fix (CAUTION)’. This will however, destroy the internal database containing the device’s serial number. This will not affect normal operation of the device, but if you want to restore it you should visit one of LGE’s customer service centers. 2nd-init based custom recoveries do not have this limitation.
Here are the final steps you should take before installing GomdoLight.
(1) Copy the GomdoLight Installer onto your device.
- Now connect your device to PC, and copy the GomdoLight Installer package onto your device. Do NOT extract the files from the GomdoLight Installer ZIP archive file; just copy the ZIP file itself.
- It is strongly recommended you copy the GomdoLight Installer package to ‘internal storage’ AND ‘external SD card’ both (if you have an external SD card).
- Custom recovery may not display non-ASCII characters, so it is generally not advised that you put the GomdoLight Installer package in a folder labeled in Korean, Chinese, or Japanese language.
(2) When the GomdoLight Installer is completely transferred to the device storage, check for integrity of the file copied.
- If the file is corrupt or damaged while it is downloaded or copied, installing GomdoLight with such a defective copy will cause the installation to fail, or damage your device.
- Be sure to perform the integrity check ON THE DEVICE (not on your PC).
(3) If you’re sure the GomdoLight Installer you will use is not any way tampered, corrupt, or damaged, now reboot into the custom recovery.
- Image based custom recovery: If you used an app to install the custom recovery, that app will probably have a on-screen button to reboot into recovery mode. Or, use the recovery rebooter mode of the GomdoLight Sideloader.
- If you’re skillful enough you can reboot into image based custom recovery without the GomdoLight Sideloader, by using the button combinations below. (NOT recommended)
– Turn on the device by holding VOL UP (or DOWN) + HOME + POWER buttons, and when you see “Secure booting Error!” message, immediately release the POWER button only.
– Turn on the device by holding VOL UP (or DOWN) + POWER buttons, release them all when you see the LG logo, wait 2 seconds, press and hold VOL UP + VOL DOWN, and finally when the screen changes release them all.- 2nd-init based custom recovery: The app you used to install the custom recovery will have a built-in button to reboot into recovery mode. Or, press VOL UP (or DOWN) several times when you see the LG logo while the device is starting up.
- If you already have GomdoLight installed, you can just use a Flag to reboot into the custom recovery. Create a file named ‘reboot.system.recovery’ (for image based), or ‘reboot.2ndinit.recovery’ (for 2nd-init based) in /sdcard/GomdoLight, and restart the device.
(4) Now that you’re in the custom recovery environment, do a Nandroid backup.
- Most custom recoveries provide Nandroid backup/restore feature. For whatever reason, installation may fail, and Nandroid backup is the most powerful lifesaver when you’re in trouble.
- It is recommended to place the backup data on the external SD card. However if you do not have one or if your device has no microSD slot, you are STRONGLY ADVISED to reboot, and copy the backup data (/sdcard/clockworkmod) to your PC. When the backup is complete, now you are ready to run the GomdoLight Installer to start the installation process.
(5) FINALLY! Run the GomdoLight Installer from the custom recovery menu.
- Every custom recovery have a menu named ‘install zip’ or similar.
- Select this menu, locate the GomdoLight Installer package and run it.
- Though it may sound silly, but be careful not to select ‘reboot system now’, which will reboot the device instead of installing a ZIP package.
For your safety, it is recommended that you review the precautions regarding the custom recovery environment.
Everything is set.
Now, we will finally configure and flash GomdoLight onto your device.
◀ Click here to go back to the flowchart
4-6. CONFIGURING AND FLASHING GOMDOLIGHT
After the long journey, now you’re actually installing the most advanced custom firmware environment for your device.
4-6.1. Beginning Installation
You have just run the GomdoLight Installer.

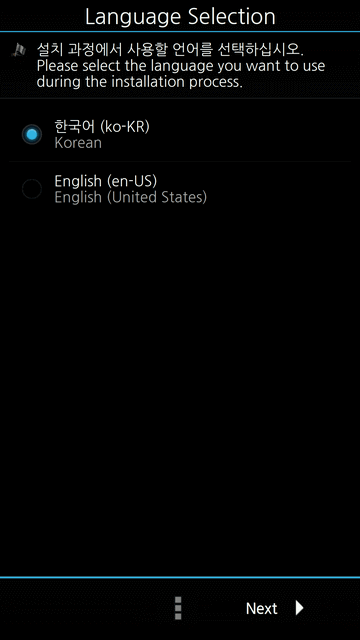
You will see the GomdoLight splash screen, and should be given a chance to select the language you will use throughout the installation procedure. After that, the installation wizard will begin. GomdoLight is designed from the ground to adjust itself to your preferences, and you will use the installation wizard to tell GomdoLight what you want — in other words you should read the instructions very carefully to get exactly what you want.
4-6.2. Battery percentage indicator options
You can choose how battery percentage indicator is displayed in the status bar during installation.
- “Easy-to-Recognize”

- “Center-aligned”

- “Stock”

If you want ‘stock’ battery indicator, select the third option (‘stock’), NOT the fourth (‘Do not overwrite the status bar’) one. ‘Do not overwrite the status bar’ does not replace the related system files, and a lot of GomdoLight’s status bar improvements will become unavailable. This option is intended only for preserving third party aesthetic modifications.
◀ Click here to go back to the flowchart
4-6.4. First boot and function check
When it finishes flashing GomdoLight, the GomdoLight Installer automatically reboots the system.
To confirm if GomdoLight is properly installed, check the followings:
- Your device should display some status messages, such as “GomdoLight: System starting up.” and “GomdoLight: System ready.” in toasts.
- Go to Settings → General → About phone → Software information. ‘Build number’ should contain the GomdoLight version information.
- When GomdoLight is newly installed or upgraded, a built-in user manual will be displayed automatically.
- You will find GomdoLightSITREP.txt file at /sdcard/GomdoLight, by the time when GomdoLight tells you that the system is ready.
Congratulations,
Now you have successfully installed GomdoLight!
* If you chose to disable ‘Google Search’, ‘Email’, or ‘Internet’, those are left active on the first boot. This is intentional; they remain active on the first boot for better compatibility and error handling. When you restart the device they will be disabled.
* If you perform a factory reset after installing GomdoLight for the first time, the system will be clear of all ‘degrading factors’, thus maximizing the performance. However it is not mandatory. A factory reset may delete all files, such as photos and media files, residing in the internal storage.
* Please note: it is completely meaningless to restore all the backup data after performing a factory reset. Minimize the use of Titanium Backup or LG Backup as possible when restoring, and try to manually reinstall and reconfigure apps and system as much as you can. If you performed a factory reset to maximize performance, stay away from Nandroid.
4-7. ADDITIONAL INFORMATION
You have configured most of GomdoLight already during the installation process, but its high flexibility makes it possible to further adjust to your needs. And when a new version comes out, it can be upgraded very easily.
4-7.1. Installing third party mods
Some advanced users might wish to install 3rd party custom components (like, ‘themes’) for their devices. GomdoLight has a special mechanism to allow users to easily install 3rd party components. This is called ‘EasyMod’.
* EasyMod works regardless of whether you’re rooted or not.
For more detailed information on EasyMod,
Refer to ‘EasyMod Template Download’ Page.
Need more information on installing EasyMod packages? See http://gomdolight.com/?page_id=1791 (in Korean language, screenshots available).
* 3rd party mods are NOT part of GomdoLight. The developer of GomdoLight may REFUSE to provide support if you have 3rd party mods installed.
* Some 3rd party mods can disable certain features of GomdoLight.
4-7.2. Reconfiguring GomdoLight
You may no longer like the configurations you set when you installed GomdoLight, or may like to use some newly added optional features after upgrading GomdoLight. GomdoLight Installer has a reconfiguration option for you, and you NEVER have to manually edit the contents of file system. You are advised NOT to alter the contents of the system partition.
To reconfigure GomdoLight, do the following:
(1) Run the GomdoLight Installer just as you did when you installed GomdoLight.
(2) From the main menu, select ‘Reconfigure’.
(3) The installer will guide you through the reconfiguration process.
(4) Your device will reboot automatically.
(5) When boot is complete, GomdoLight will automatically reconfigure itself. This may take up to 3 minutes.
4-7.3. GomdoLight Updates and Upgrades
Upgrading to the latest version of GomdoLight is generally easy. However you should carefully follow the upgrade instructions for each release.
Most of times just ‘Upgrade/Repair’ option will do, but sometimes there might be some special instructions, and there might be times that a new version of GomdoLight requires a base firmware update.
(1) Upgrading via the ‘Upgrade/Repair’ option
- Run the GomdoLight Installer through the GomdoLight Sideloader or a custom recovery.
- Select the device model, and from the main menu choose the ‘Upgrade/Repair’ option.
- Press ‘Install’. You do not have to go through the configuration process.
- When the installation finishes, GomdoLight is upgraded.
(2) If the new version requires a base firmware update, this is essentially the same thing as a fresh installation of GomdoLight.
- Therefore, first ▶ Uninstall GomdoLight completely, then start from ▶ DOWNLOADING GOMDOLIGHT INSTALLER PACKAGE.
- Sometimes an OTA update might be still available after flashing the stock firmware. In this case refer to the firmware compatibility table to find out whether if the update will be compatible with GomdoLight.
Remember, it never hurts to read the upgrade instructions.
4-7.4. Uninstalling GomdoLight
If you no longer wish to use GomdoLight for whatever reason, or if you need to update the base firmware, you should 1) first back up everything, in case the stock firmware might fail to flash properly, 2) then ▶ Install the stock firmware to completely uninstall GomdoLight.
5. TROUBLESHOOTING / SOLUTIONS
Here you can find how to solve or mitigate problems that you might encounter while using GomdoLight, and some tips to make GomdoLight better serve your needs.
5.1. Troubleshooting
If you think your device is not working as expected after installing GomdoLight, check the ‘Troubleshooting’ section of the User’s Manual BEFORE ASKING A QUESTION.
5.2. Tips and solutions
You can find additional information that may aid you below.
5.2.1. User’s Manual
The new, simplified User’s Manual provides the most essential information about GomdoLight in a very short, simple, and straightforward way. For how to open the built-in user manual, refer to the tutorial .
5.2.2. Check for the Update Center after installing/upgrading GomdoLight
Every GomdoLight release contains up-to-date applications in the ‘Update Center’. There are some applications that you cannot obtain from the Play Store. Update Center allows you to easily install these components, and sometimes can suggest new applications that you may find useful.
5.2.3. Rooting and unrooting
(1) To unroot, instead of unrooting from the SuperSU app, create a file named ‘disable.root’ in /sdcard/GomdoLight without extension, and restart your device.
(2) To root, just create a file named ‘enable.root’ in /sdcard/GomdoLight without extension, and restart your device.
6. GOMDOLIGHT LICENSE
License for GomdoLight can be found below. This document is very important as it defines your legal rights and obligations; please read very carefully.
GomdoLight License (opens in a new window)
7. THIRD PARTY COMPONENTS
All third party components are credited in the GomdoLight Users’ Community (Korean).
8. GOMDOLIGHT KITKAT DOWNLOADS
It is recommended that you download the GomdoLight Installer from PC.
Remember, ALWAYS DO AN INTEGRITY CHECK before installing GomdoLight.
Corrupted or damaged installer can critically damage your device.
◀ Return to ‘DOWNLOADING GOMDOLIGHT INSTALLER PACKAGE’ step
HOLD ON! If you find GomdoLight useful, how about showing your support by donating some? Even the smallest amount helps me a lot.
2017. 11. 1. GomdoLight KitKat Wave 5, Revision 4 – for G / G2 / G3 / G3A / G3cat6 / Gflex / GK / Gpro / Gpro2 / Gx / Gx2 / LTE3 / Vu2 / Vu3 / Gpad7LTE
업데이트 수준update level: 중규모medium
중요성importance: 높음high
기존 사용자 업그레이드 지침:
- 버전별 설치 옵션 선택|Installation Options
현재 설치된
GomdoLight 버전지원되는 설치 옵션 5.3bis (only) 5.3bis에서 SMS에 특수문자를 입력하면 MMS로 전환되는 문제를 겪고 있다면 순정 복원 후 새로 설치
If on 5.3bis and experiencing issue where SMS switches to MMS (regardless of its length) by using special characters, install stock firmware and reinstall GomdoLight5.0 ~ 5.3 ‘업그레이드/복구’ 옵션으로 간편 업그레이드 가능
Easy upgrade supported (Select ‘Upgrade/Repair’ option from the GomdoLight Installer)1.0 ~ 4.11 순정 복원 후 완전히 새로 설치 (업그레이드 지원 안함)
Upgrade not supported (revert to stock, and perform a fresh install from scratch) - 버전별 사전 준비 절차|Prerequisites
현재 설치된
GomdoLight 버전설치 전 해야 할 일 1.0 ~ 4.11 순정 복원을 선행하여야 하므로 그 외의 추가 작업이 필요치 않음
None, as you should flash the stock firmware first before installing Wave 5
* GomdoLight 업그레이드 방법에 대해 자세히 알아보려면 ▶ ‘새로운 버전의 GomdoLight로 업그레이드’의 설명을 참고하십시오.
- LG Optimus G (LG-F180S/K/L)
download – GLkk-Wave5.rev4_lge_G.zip
- LG G2 (LG-F320S/K/L)
download – GLkk-Wave5.rev4_lge_G2.zip
- LG G3 (LG-F400S/K/L)
download – GLkk-Wave5.rev4_lge_G3.zip
- LG G3A (LG-F410S)
download – GLkk-Wave5.rev4_lge_G3A.zip
- LG G3 Cat.6 (LG-F460S/K/L)
download – GLkk-Wave5.rev4_lge_G3CAT6.zip
- LG G Flex (LG-F340S/K/L)
download – GLkk-Wave5.rev4_lge_GFLEX.zip
- LG GK (LG-F220K)
download – GLkk-Wave5.rev4_lge_GK.zip
- LG G Pro (LG-F240S/K/L)
download – GLkk-Wave5.rev4_lge_GPRO.zip
- LG G Pro 2 (LG-F350S/K/L)
download – GLkk-Wave5.rev4_lge_GPRO2.zip
- LG Gx (LG-F310L/LR)
download – GLkk-Wave5.rev4_lge_GX.zip
- LG Gx2 (LG-F430L)
download – GLkk-Wave5.rev4_lge_GX2.zip
- LG Optimus LTE3 (LG-F260S)
download – GLkk-Wave5.rev4_lge_LTE3.zip
- LG Optimus Vu 2 (LG-F200S/K/L)
download – GLkk-Wave5.rev4_lge_VU2.zip
- LG Vu 3 (LG-F300S/K/L)
download – GLkk-Wave5.rev4_lge_VU3.zip
- LG G Pad 7.0 LTE (LG-V410)
download – GLkk-Wave5.rev4_lge_GPAD7LTE.zip
변경점changelog:
- 개선: 오류 수정 및 안정성 향상
Improved: Bug fixes and stability improvements - 개선: EasyMod 설치 안정성 대폭 향상
Improved: Greatly improved reliablity of EasyMod installation - 개선: EasyMod 설치 과정을 더욱 사용자 친화적으로 개선
Improved: EasyMod installation is now more user friendly - 변경: EasyMod 패키지 형식 개정
Changed: Introduced new EasyMod package format - 변경: GomdoLight 앱 관리자에서 MoreLocale 2를 더 이상 제공하지 않음 (처음 설치하는 경우에만)
Changed: Removed MoreLocale 2 from GomdoLight App Manager (first time new users only) - 개선: GomdoLight 시스템 이미지 복원 기능을 사용할 때 이미지에 특정 오류가 있어도 이를 자동으로 정정하도록 개선
Improved: GomdoLight System Image Restore now automatically fixes some known errors - 변경: 이모지 서체 선택 옵션 제거
Changed: Removed emoji font selection - 변경: AnZhi 리커버리 지원 완전종료
Changed: AnZhi recovery is no longer supported - 변경: 성능 제약 모드 완전 폐지
Changed: Removed support for GomdoLight Powersaver
WARNING: Do NOT mirror the GomdoLight Installer files.
GomdoLight Installers should be downloaded only from http://gomdolight.com.
DO NOT UPLOAD TO OTHER SERVERS.
9. GOMDOLIGHT TOOLS
KDZ Flasher utility. Used when ▶ Installing the stock firmware, or ▶ Completely uninstalling GomdoLight.
GomdoLight Sideloader. Used when ▶ Directly installing GomdoLight onto the Sideloader-supported devices.
Detailed information on EasyMod and a download link for the EasyMod template file. For more information refer to ▶ ‘Installing third party mods’ section.
10. SUPPORT
Support is done in the forums. DO NOT USE PM TO ASK QUESTIONS. Use the board so that others can participate in the support process, and the solution to your problem is made available to the public.